Experienced painters will have thorough experience in diluting/thinning their paints, and dilute them in a few different ways depending on what they want to accomplish. Most people start out using just water. While water works ok, you are better off using products from your local art shop for extending or diluting your paints. Some other time I might write a bit more about that, but for now, just a few simple tips for the Vallejo Matt Medium (yes, matt, not matte).
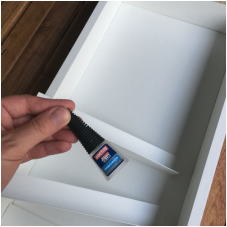
This is just a short blog post to highlight a very useful tool - the Medium and specifically matte medium.
Experienced painters will have thorough experience in diluting/thinning their paints, and dilute them in a few different ways depending on what they want to accomplish. Most people start out using just water. While water works ok, you are better off using products from your local art shop for extending or diluting your paints. Some other time I might write a bit more about that, but for now, just a few simple tips for the Vallejo Matt Medium (yes, matt, not matte).
2 Comments
A showcase post is just to highlight a few miniatures I have painted and share some nice pictures. This time the pictures are of High Elf Phoenix Guard for Warhammer Fantasy Battle or Age of Sigmar. These were painted with non metallic metals, gold and silver. Here is the front: ... and the back with the fiery capes: Some detail shots of the non metallic parts and the banner: And finally two photos augmented with special effects:
The Space Marines, or Adeptus Astartes, pictured above were all painted using ONLY shades/glazes/washes (and pure white). And it took very little time. Some will be astonished by this, not because of the level of painting, but that you can achieve what is a very decent table top level with depth of highlighting and shadows very quickly and with just washes to boot. This post is not mainly about painting space marines, but a general post about how you can use shades and glazes. This can mean products from the citadel line of shades and glazes, but could also mean similar products from other manufacturers, or indeed thinned down paint (with medium preferably).
Some of you may want "recipes" for painting the various chapters. Here are a quick rundown of the colors used for some of the chapters I've tried out: Please note that they were all: Primed White -> Shaded with Nuln Oil -> drybrushed with White Scar (a pure white) Also, these are the colors or techniques used for all: Purity Seals: Carroburg Crimsson *2 (twice applied) Scrolls: Agrax Earthshade Flesh: Reikland Fleshshade Metal like parts of guns and the like: Nuln Oil Gold: A little special trick: Silver basecoat (Leadbelcher) and then Seraphim Sepia. Eyes: Painted normally, layers of red through orange with gloss varnish last.
Some other WIP pictures and examples of finished Blood Angels: Finally, I would like to add some general observations on the Citadel Shades and Glazes. Observations on the glazes They are quite shiny, which is a bit bad considering what they are meant to be used for. This can be solved with a bit of matte medium mixed in (just a little bit). You can also paint the surface with a bit of matte medium afterwards. Another problem with this shiny quality is that it looks strange if the glaze flows into recesses, as these definitely should not shine – there is no light falling there! So, be careful when applying these. Observations on the shades and glazes in relation to wash painting techniques For dark green like Dark Angels, you need to mix in a bit of Nuln Oil. This does work quite well though, and makes for a nice military green, particularly with a bit of athonian camo shade thrown into the mix. Sepia works very well as a brownish yellow, while the cassandora yellow is more orange. See these goblins for example of “sepia yellow”: Cassandora yellow does however work very well for Imperial Fists and that sort of yellow tone. See above! When wash painting - There is no red shade that goes towards orange. Fuegan Orange is an orange shade, but more yellow than red. Carroburg crimson has a lot of blue in it and with several layers goes from pink to crimson, to purple/crimson. To achieve Blood Angel red you need to use both carroburg and bloodletter glaze. The bloodletter glaze is quite orange on the other hand, but also quite thin to use by itself for wash painting. Glazes does not work very well on their own, unless you only want to slightly tint something. This means that they work fine over chaos armour for example: (official GW picture)
But they do not work very well for applying a deeper color with over white. This is for two reasons: One, they are too thin, it will take you 4-5 layers to get a deep color. Two, they create too much shine. This is fine over metal armor, but not on colored cloth. This is not a big issue with one layer over an already highlighted piece, but definitely a problem if you use several layers of glaze. Again, a bit of matte medium solves this. I hope this was valuable to you and if you liked this - follow me on instagram or facebook - see links to the right of this page. This is a bit of a story and a bit of a guide on how to build a paint shelf. This was made mainly for citadel paints, but could with slight modifications be done for Vallejo paints for example, or a mix of different brands. You just adapt the shelving height to accommodate different bottle heights.
I did find a few different solutions though, and a few ideas on how to build my own. Of the ones actually made for this purpose, this one is a good choice: This one is made by Wargame Model Mods. You can find their ebay store here: http://www.ebay.co.uk/usr/wargame-model-mods. My main issues with this one has been that the measurements does not fit my needs, I prefer a taller thinner shelf. It is also relatively pricey, especially with shipping. Well, as there aren’t many alternatives, the price is ok, I guess, but more than I really wanted to pay. Also, personally, I think it is a bit ugly – which could be solved with a paint job perhaps. These are ordinarily used inside walls when you build houses, and thus not often seen. I happened upon picture of these by chance as I was looking at pictures of shelves online. I then asked a relative who works with building and construction, and a bit of carpentry, if he knew what these things were. Turns out he did. They are something called “plastic corner wall protectors”. They can only be found in specialty stores but are quite cheap – do a google search and see if you can find some near you. They can be bought in a different measurements. These are 40 mm x 40 mm, just right for a citadel paint bottle. I also needed some sort of frame to fasten these to, of course. I decided I would build a complete frame with a back. The plastic shelves would then be fastened with glue to the back of this, while the frame held it together. The frame is not necessarily needed if you intend to attach it to a wall, but it does keep the paints from falling off the sides. Also, you can use the top to store more things, like this:
The measurements were these (in mm): - 1 backside: 600 high, 300 wide - 2 sides: 650 high, 100 wide - 1 top: 300 long, 100 wide - 1 bottom: 300 long, 100 wide Each of the plastic corner protection, ie the actual shelves, were cut (or sawed, actually, but they can be cut if you have a sharp knife - be careful!) to be 295 mm wide (a little less so they would fit easily inside the frame). Here is a quick rundown on how the shelf was built: You will need, apart from the above mentioned, screws to assemble the frame and the back. Make sure the screws are of sufficient length and have a flat head like in the picture below. You also need a drill (and a screwdriver of course).
Now, press the board down onto the top, or bottom, of the backside board. Then screw it into place. Be careful that you do not make the same mistake I did below. The middle screw was fastened to hard and broke the board a little bit. This meant that this was the bottom side... so it does not show, but still... Then repeat for the other side of the shelf. It was then time to do the sides of the frame. I decided to do two screws to the top and to the bottom, and two more along the length of the backside. Where you put these is not overly important. One thing I did keep in mind is that I wanted the sides to stick out a little bit at both the top and the bottom. The reason for that was twofold: 1, I wanted the sides to act as "feet" for the shelf. 2, I wanted to have slight "walls" at the sides of the topside, to keep stuff in place up there. This is of course a matter of taste, I guess that a flat top would be more aesthetically pleasing for some people. I'd recommend the "feet" though, because that is good if you want to place the shelf on anything sensitive (the screws might scratch a table surface otherwise). Now, it is time to set the shelves. At this point, if not before, you need to consider what kind of bottles you want to fit on these shelves and do a dry fit. You lay the shelves down and try it out with different bottles. When you have it all planned out, bring out some super glue. You can use screws for this too, but you do have a nice flat surface for glue, and I found that both easier and more pleasing to the eye in the end. I then painted all the rough sides white. As mentioned above, if you are clever when you buy and have the boards cut, you might not need to paint as many sides of these... I also put a bit of scratch protection at the bottom "feet" of the shelf. These can be bought most anywhere I guess. This particular brand is one that you can cut pieces out of a mat and glue to the surface you want. But any kind would work. This part is obviously not necessary, but I like to protect my desk... Here are a couple of pictures of the finished shelf: I think it looks wonderful with the thin thin shelves and it is VERY efficient! I am very happy with the end result. The actual building process took about two hours.
I hope you found this useful or entertaining. Please do ask if you have any questions. Follow "jesterpainting" on instagram for weekly hobby pictures and Jester Painting Studio on facebook. I wanted to follow up on the blog post on speed painting that I posted a little while ago and show case a few pictures of Goblins painted in a similar way. You can find the first post here: How to Speed Paint Skaven I was asked by a member of the facebook community if these techniques would work with black clothes/robes and specifically for Night Goblins. Night Goblins, as all horde armies, are a pain to paint just because of the sheer number of miniatures you need to paint. Anything that alleviates that or saves time would be a big boon of course. I was fairly confident that it would work for darker colors, including black, but that it might take a tiny bit more time. It also happened that I got the opportunity to paint a unit of Night Goblins for costumer. It was only a small unit of 16 goblins. The arrangement was that I paint those to showcase how it can be done, and supply instructions so that the he could finish the rest on his own. Anyway, here are the results: This is basically the same technique as with the Skaven with a few minor differences:
- The metal is done with only Nuln Oil. This could be further nuanced with rust/dirt, but looks really nice as is. - The black on the robes are done simply like this: Initial wash of nuln oil, drybrush with pure white, nuln oil wash two or three more times. These washes were done until the results were satisfying, and could be less to achieve a lighter grey tone, or more to achieve a darker tone. I think they look really nice for a nice table top level. I am planning to experiment a bit more with glazes, and specifically combining shades and glazes, and I might do this with tactical space marines. Also coming up is a WIP shot of some current projects, including an interesting Necromunda gang project. This is the final part of this guide on how to paint the Fortified Manor. It is also a guide on how to paint buildings in general and of course a guide on how to paint the Chapel and the Watchtower. With slight variations, it can be used for many other similar buildings as well. This part will detail how I painted the smaller areas on the buildings. These parts were done rather quickly, compared to the other parts of the buildings. What makes the building pop, I feel, is the walls combined with the roof tiles and stone. First, the wood parts. These were painted in a very simple way, which is probably familiar to most people. It is a process which looks like this: The first drybrush of medium brown (Mournfang Brown or in my case Beasty Brown from Vallejo) can be quite heavy, while the second should be lighter and more aimed at the edges and lightly across the open areas to create a bit of texture. Do these drybrushing steps for the flat parts of the wood too, like the sides of the windows pictured below to the left. If done right, this "fakes" a bit of texture on these parts as well. Examples of finished wood parts: The flooring below deserve an extra mention. To make these boards look realistic, they need to differ from one another. No plank looks the same. For this purpose they were treated much like the stone parts in part 3 of this guide. Some of them were given an extra drybrush of ushabti bone to lighten them. Others were washed (after drybrushing) with agrax earthshade and some with athonian camoshade, in order to create different hues and levels of lightness. The bronze does deserve a guide in itself, and I wish I had taken more photos during this process. But alas, I will try to explain as well as I can. These colors were used: The process is fairly simple: 1, Basecoat with Hashut Copper. This color does not cover very well and you will probably need to layers of basecoat. Don't be tempted to put on a very thick layer. Be patient and do two layers! 2, Wash heavily with Agrax Earthshade. Make sure the wash gets into all the recesses, especially on the statues. Make sure this is completely dry before moving on to the next step. 3, Apply Nihilakh Oxide. This paint is one of the technical paints that Games Workshop released about a year ago. They are all very useful and this particular paint makes for great verdigris effects with little effort. It is similar to a wash in consistency. Apply it in much the same way, but this time focus on areas where (rain) water would pool and run on the statues, doors, signs, etc. This is sometimes the reverse of the shadows, as some shadowed areas might be protected from rain, but generally this means recesses and deeper areas where water might gather. On the doors, this means around the little spikes and other details like that, and generally near the bottom. After applying, wipe of the excess with a paper towel. You can always apply another layer if you want more verdigris, just make sure you do not leave any right on the top of the statue for example. 4, Do a quick drybrush of Hashut Copper to bring out the base color and highlight areas which have been darkened by the wash. This can also fix some ill applied Nihilakh Oxide. 5, Drybrush and do some quick edge highlightning with Ironbreaker/Chainmail. Keep this very light and it will make the areas pop. For the doors, also do some very light brushing/stippling across the whole areas. This will look like weathering and create a bit of texture/structure to the bronze. Examples of finished bronze parts: The other metal parts. There are quite a few metal parts on the houses. There are spikes, rivets, chimneys, pipes, etc. I decided to paint the pipes and chimneys in brass/bronze, but without verdigris, and instead sooted. Some details, like skulls and symbols/shields and decorative elements, were painted bronze, just like the doors and statues above. The other metal parts were generally painted leadbelcher/boltgun metal, and quite dark and dirty. In general, these were done fairly quickly, putting a bit more effort into the brass than the grey metal parts. The grey parts do not particularly stand out, so I felt that it was not worth putting more time into. The brass was painted much like the bronze above, but without the verdigris. Instead I washed them extensively with agrax earthshade and nuln oil after painting them, to make them look sooty and dirty. The silver parts were basically painted boltgun metal/leadbelcher, washed with nuln oil and drybrushed with chainmail/ironbreaker. I then dirtied them a bit, especially under them, with agrax earthshade and nuln oil. Examples of finished metal parts below: Skulls. There are a lot of skulls detailed on these buildings, as with all GW terrain... If you do not like them, you can in some cases choose to cover them with windows, but there are still quite a few left. I decided that most of these would be bronze skulls. Most of the skulls do look ornamental and too smooth and positioned in a way that suggests that they are made of stone or metal and not real skulls. So, the choice on these skulls was basically – stone or bronze? I thought that bronze went well with the rest of the color scheme and so painted most skulls bronze, in just the same manner as the doors and statues described above. I did paint a few skulls like real skulls. These were the skulls that looked like real skulls, that had cracks or were positioned slightly askew, anything that suggested that they might be real skulls. The most typical ones were in the alcoves of the chapel (see the left and right picture below). These skulls can be painted in many different ways. I like this way: Karak Stone base – Wash Agrax – Karak stone/ushabti bone – Ushabti Bone Examples of finished skulls, bronze and ordinary: This wraps up this four part guide on painting the fortified manor. I hope that you found it useful and/or entertaining. If you have any questions or comments, feel free to contact me.
Also, if you want updates, make sure that you like and follow me on facebook and/or Instagram: Facebook: Jester Painting Studio Instagram: jesterpainting This is part 3 of this guide on how to paint the Fortified Manor, and this kind of scenery overall. For this part we will look at how to paint the roof tiles. First, let's start with the roofs. The Games Workshop pictures often depict these as having blue tiles. In this case I wanted a more natural look, a more historical medieval look. That said, if you want the manor to look spookier, I think it'd be cool to go for purple/blue tiles and darker stone. In that case, I might've tried working up from dark grey instead of from yellow on the walls. So, let have a look at how to achieve this: It looks a bit different depending on the light, doesn't it. The colors used for the roof tiles were: The process is fairly simple and somewhat similar to the way the stone parts were painted. 1 Base all roof tiles with Doombull Brown. Make sure you remember all the small roofs over some windows and alcoves if you have added those extra. See bottom left in the picture below for an example of one of those small roofs. Base painting these is quite time consuming, but make sure you have a nice good coverage, without spoiling the little cracks and structure sculpted into the tiles. 2 Wash everything heavily with Agrax Earthshade. Slop it on there. You can use a lot of wash, and the darker the recesses between the tiles get, the better. The only thing you want to a be a little bit careful of at this stage is wash running down over the walls. That might look like rain spots though, so hey, maybe it'd look good... 3 Drybrush with a 50/50 mix of Doombull Brown and Ushabti Bone. Make sure the drybrush is really dry (and the tiles from the washing!) and go over the whole area twice. You want both edges but also the flat surfaces to catch a bit of color, a bit of structure. 4 Drybrush with 25/75 of Doombull Brown and Ushabti Bone in the same manner as before, making sure you catch all the edges. 5 Drybrush carefully with 10/90 mix of Doombull Brown and Ushabti Bone. Also, at this stage, you want to select individual tiles and brush them a bit extra to make them lighter. This is the first step to achieve variation across the tiles. 6 Wash selected tiles with Agrax Earthshade again. Vary the amount and number of times you wash these tiles and remember that variation is what you are looking for here. You can use other wash colors in addition to Agrax Earthshade, like Carroburg Crimson, if you wish. Keep on washing and drybrushing until you are happy with the result. The next post will detail the wood and metallics and will be posted rather soon... base paint the wood with Rhinox Hide!
In this part I will describe how I did the stone parts of the Fortified Manor. Part 1 describes how the walls were painted and can be found here. These paints were used when painting the stone parts: Using all the washes above are not necessary, but will add a bit of variety to the stones and the washes speed up the process. For me, speed is usually a prioritity, although you can save a bit of money by thinning paints or by mixing in a few other colors into the washes instead of using this many washes. But you do need Nuln Oil and Agrax Earthshade. It would be an interesting choice to use black, blue and purple washes for this, but I feel that the red, brown and yellow tones tie nicely into the roof tiling. But those could also be painted dark grey or bluish, and you’d have a different feel to the piece. I digress… So, step by step, this is how I painted the stones: 1, Base paint all the stones with Dawn Stone. This is the most time consuming step. Conceivably, you could start with a darker grey and drybrush a dawnstone layer, but I feel that dawnstone with nuln oil looks just as good, although a bit lighter (and is faster). Also, you could drybrush heavily instead of base painting the dawnstone layer, but in this specific case, I think that that would be too messy, since you do not want to ruin the nice walls. That said, even when base painting, be careful around the walls! 2, Apply a black wash. I use Nuln oil and apply it quite liberally. You do want to darken the stones and shade the cracks and crevices. Also, I also shaded the cracks between stones and other areas of the house. 3, Drybrush with Administratum Grey or a similar light grey. You really want to keep your brush dry for this and not use any excesses of color. Also, use a medium drybrush for a compromise between precision and speed. You can use a large one for the big stone walls if you want to save a bit of time, but be extra careful not to use too much paint then. When doing this drybrush I use circular motions and lightly brush all over the stones. You want to work up something which resemble the texture a stone has. Similar to the plaster, I think several thin thin drybrushed layers achieve this effect pretty well. As a general advice here, drybrush liberally but with a dry brush. In essence, drybrush widely and wildly, but rather a few thin layers than one messy layer. I hope that makes sense. 4, Drybrush with White Scar or a similar white color. This step is very similar to step 3, just do it a bit lighter and a bit more focus on the edges. You want to catch all the edges here, but also lightly brush the flat surfaces to create more depth. 5, Extra drybrush of white. To create variety, choose stones randomly and give them a bit of extra white drybrush. Make them lighter than the other stones. Again, very little paint on the brush. 6, Apply washes. This is a bit of a free form step. Now you want to apply washes to randomly selected stones to give them a bit of difference in sheen, color and darkness/lightness. When doing this I put a little pool of each wash on my palette like this: I then dip my wash brush in these washes pretty much at random, sometimes going all out with one wash, sometimes a combo of two or three. These various tones are then applied to random stones all over the stony areas. You do not want to wash every stone this way, but quite a few of them. Some I gave a light wash, and some several layers, to achieve variety in both color and darkness. And that wraps this part of the guide up. At this stage you might want to base color all other parts of the buildings, as the coming parts are not quite as messy as the walls and the stones. Examples of finished stonework below: Next part will cover the metal parts as well as the roof tiles. Get your Doombull Brown ready for roof painting.. or well, paint the roofs with Doombull Brown already.
I received a few requests on Instagram to post some sort of guide for how I do speed painting for my Skaven Clanrats/Slaves. So, here is a guide. This way of painting will work on many other miniatures too. Basically any army that have many rank and file can benefit from this method. It does work best with “dirty” armies like Skaven, Orcs, Beastmen and so forth, but does work rather nicely with Imperial Guard/Astra Militarum and The Empire too. Here is a finished picture of the recently painted clanrats using these techniques: As you can see, the end result is quite striking with a good depth of shades/highlights. Not perfectly clean, but really good table top for the time it takes. It does not make for a “clean” look though and while you can use the techniques described below for Elves for example, it does not save as much time and you will need to finish up with standard layering work if you want a good finish. But, that said, it can work rather well. These High Elf Spearmen were painted this way, even though I finished them off with some blending and detailing to clean them up. For the Skaven above, these colors were used: And for optional finishing touches and basing: I also used a bit of medium, but this is not really needed, water will do an ok job too. Step by step guide: 1, Prime your miniatures white.Even though I only painted four miniatures for this example, I would urge you to do more while you are on it – 20 or so! 2, Wash them with a black wash like Nuln Oil. Work from the bottom up and really slop it on there, over the whole miniature. Make sure that all crevices and areas where shadows would naturally occur are covered. However, do make it quick, speed is the thing here. This stage is a bit of a speed bump, as this layer needs to be dry before proceeding. Paint something else in between or prime some more miniatures. 3, Drybrush with white.Now, here is the real trick. Essentially, what we are doing here, is pre-shading and pre-highlighting. This is a common technique when painting larger vehicles and buildings, and often done with an airbrush, but it works with small infantry too! 4, Color washes. Bring out your colored washes. For the skaven I used Ogryn Flesh (Reikland Flesh), AgraxEarthshade (brown) and Carroburg Crimson (red). Essentially, you paint all parts of the miniature except the metal parts: Wood: AgraxEarthshade Flesh: Reikland Flesh Fur: AgraxEarthshade Cloth: Carroburg Crimson (you could use any color here, depending on what you like. AthonianCamoshade looks really good if you want a muted green tone) For this stage, you might need to do more than one layer on some parts to achieve the desired tone. This is where it really works well if you do 10-20 at a time. Start with the flesh for example, go over all minis once, and then do them all again where needed. The washes DO NOT need to be completely dry before applying another layer. Also, you DO NOT need to wait for one color to dry before going ahead with another. It does not matter if there is some small overflow here and there. Remember, speed is what we are going for. That said; try to be neat if you can. 5, Metal wash. For this step you will thin down a metal color to a wash consistency. This might seem crazy, and not something you would ordinarily do, but in this case it does work pretty well. Basically, take a metal color and thin it down with medium or water. I find that medium works better for this, but water is ok too. I used Chainmail/Iron Breaker, but a darker metal like Leadbelcher would work too. Make sure that the color is really thin – err on the thin side rather than the thick side! Apply it across the metal areas. This time, try to be neat, as it will not look good if you spill too much on other areas. 6, Finishing touches. At this stage, you can call them done. But I like to do some quick finishing touches that give good “value for time”: - Paint the eyes red (or yellow) - Paint the teeth with bone (thinned down ushabti bone for example) - Weather the metal parts. The method I used was by going the quick route (again – speed!) and using first (watered down) Typhus Corrossion applied over most of the metal and then stippling on a bit of Ryza Rust over this. I recommend stippling (essentially “stabbing”/poking) because drybrushing covers the edges of the metal, which generally stay rust free. I then did a quick edge highlight with Runefang steel. Done: Regarding Basing, you can do this in whatever manner you want and like. I made the mistake of priming them before applying sand to the base. You can use the prehighlight/shade+wash paint method on the base too, and that works decently well, actually. In the picture above I did a more conventional base:
- Rhinox Hide base paint - Drybrush with Bestial brown/Skrag brown - Drybrush lightly with Ushabti Bone - Add flock. In this case I used the Middenheim Tufts pack. Quick way do to it and looks pretty nice, although there are cheaper options for sure. Questions and comments are welcome. If you want to receive updates when the next blog post is up, make sure to follow Jester Painting Studio on Facebook (or Instagram: jesterpainting). Next post will be a continuation of the guide for painting the fortified manor - next step is doing stone (and possibly roof tiles).
The Fortified Manor is a fantastic piece of scenery from Citadel and Games Workshop. Unfortunately it is no longer available, except on eBay for exhortionist prices. It used to be very good value for money considering all the components that you got: A watchtower and a chapel, a connecting piece to make a manor, and a set or walls & fences.
I was lucky enough to pick one up before they ran out of stock and recently painted it. Here is a picture of the finished manor:
This is what I call the "clean" version. It does have some weathering done, though. The bronze parts have verdigris and some of the metal is painted to look worn and dirty:
I plan to weather the whole piece with stains from where rain has affected it on the plaster, more rust and dirt on and around the metal parts, and so forth. I will probably detail that process too later in an other blog post, but for now, we will focus on painting this to a "clean" version.
Now, before starting any painting, you clean, assemble and base coat the whole piece. I would strongly suggest spraying the whole thing black. I find that for building that black work much better as a base coat. Buildings in general have darker tones and black is more forgiving, which is not a bad thing when you have that much plastic to paint. Now, in some cases, painting something like this in pieces might be good advice, but in this case, I would advise the opposite. Assemble first, then paint. The reason for this is all the unsightly gaps on the model, most apparent around the corners of the tower and chapel. You want to cover these with green stuff. Whether you use the solid green stuff or the liquid depends on the gap and what you are covering. Here is an example of a gap like this:
For this post, I thought I'd cover painting the plaster, which is what I did first. The reason I started with this is simple - it is messy, and you would get paint on other details if you did it after anything else. When painting the plaster, I used these colors:
You also need a large brush for base coating, a medium sized drybrush and whatever brush you use for washing.
Painting the plaster is basically made in five steps, with emphasis on the final two: 1, a first layer of yellow 2, a heavy wash of brown 3, splotches and irregularities in brown 4, several layers of heavy drybrushing bone color 5, more selective drybrush of white
|
Follow on facebook to receive updates:
Archives
November 2015
Categories |